DarkComet RAT(Remote Administration Tool) Tutorial
How To Setup DarkComet
(NOTE: Download link for DC is taken down, so for the download link, read the note below as you follow instructions.)
(IMPORTANT NOTE:This tutorial is for educational purposes only, so whatever you do with DarkComet is not my responsibility. I'm making this tutorial so that beginners might learn to setup a RAT for themselves, and give them a little background on what does a RAT really do.)
A Few Reminders
Before setting up Dark Comet, let's do some checking first in your computer, so as not to have troubles while setting DarkComet up.
First of all, if you're gonna setup DarkComet on your main OS, which might have an Anti-Virus program, you might wanna turn your Anti-Virus program off for the moment, or better yet, you might wanna setup DarkComet on a Virtual Machine (VM), so you won't have to worry about security.
Second, make sure that your firewall is off. So as not to have problems forwarding your ports later in the tutorial. Your firewall may block the connections, so you must turn it off. This includes the OS firewall, any other firewall such as COMODO, and your router firewall.
(NOTE: If you're still worrying about your security, I highly suggest you do this on a VM.)
Lastly, make sure you have access to your router's page/panel. If you don't know how to access it, I'll tell you how later.
Okay, so after checking all of that, let's proceed.
Things You Will Need
Download DarkComet:Here
(NOTE: Don't worry it's safe to download if you want you can test it on sandboxie.)
Download Sandboxie:Here
(NOTE #1: If you download the RAT when your AV is on, it should detect it as a malicious program, which is just a false positive.)
(NOTE #2: The file which you can download above is a fresh download from the old DarkComet site before it went down. I can assure you that it's clean. You can even upload it to VirusTotal if you're too paranoid. If you still don't trust the link/file, DON'T DOWNLOAD IT.)
Next thing you will need is to create an account in No-IP, for your DNS (Domain Name Server). Don't worry, it's free.
Here's The Link:NO-IP Offical Site
Lastly, after creating your account, you will need to download the No-IP DUC (Dynamic DNS Update Client.)
Here's The Link:NO-IP Official Site
Okay, so you're one step closer to success.
First Things First
Okay, so now, we will be starting the real setup.
Login into your No-IP account.
After logging in, you should see this 5 icons:
Login into your No-IP account.
After logging in, you should see this 5 icons:
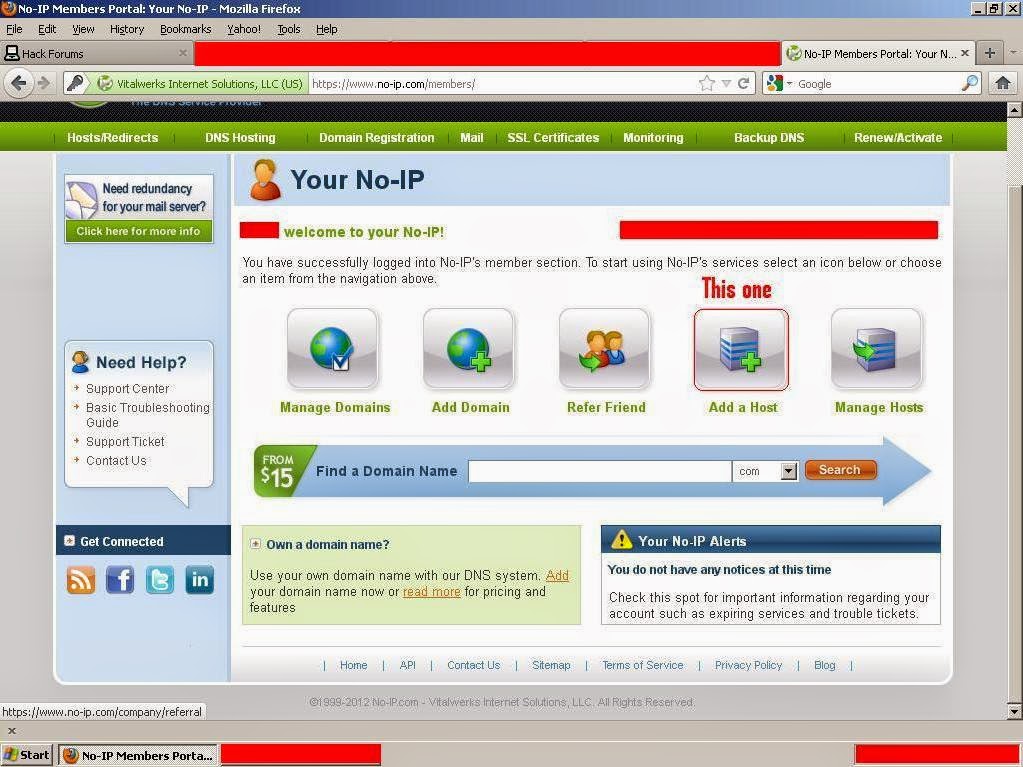
Click the "Add a Host" icon, the one with the red box in the image.
You should be redirected to this page:
You should be redirected to this page:

Now, let's do it step-by-step.
In the "Hostname" text field, as I typed, you can type in your preferred host name there, but without spaces or any special characters, just numbers and letters, just for simplicity.
In the Host Type options, just leave the default "DNS Host (A)" option.
Then, the default extension should be "zapto.org" in the drop-down box. You can change it to whatever you like, but I personally recommend you to use .no-ip.biz or .no-ip.info, because in my experiences, some of the extensions causes problems.
In the IP Address, leave it as is, because your IP should be there by default.
As for the other boxes, leave them all by default.
After that, just click on the "Create Host" button at the bottom.
Now, that we're finished with your DNS, let's setup DarkComet itself.
DarkComet Setup
Now, go to the folder/directory where you downloaded DarkComet. It should be a .rar file, so you should have WinRAR to extract it.
If you don't have WinRAR, you can download it here:WinRAR Official Site
If you don't have WinRAR, you can download it here:WinRAR Official Site
(NOTE: Again, if your AV is on, it will detect the contents of the extracted file as malicious programs, so you might wanna turn off your AV.)
After extraction, you should get a DarkComet folder. Just navigate through it until you find the DarkComet.exe, which is the main program.
After executing it, you should get something like this:

Now, click the "DarkComet-RAT" drop-down button on the upper-left corner of the program, the orange button, and click "Client Settings".
You should come up with something like this one:
You should come up with something like this one:

(NOTE: The settings in the picture are my personal settings so just experiment with it and play with it or just follow the text below.)
Now, let's do it again one-by-one.
In the general settings, leave everything as it is, except the "Traffic encryption merge key (password): " text field. Enter your desired password in the text field.
(NOTE: Don't forget the password, you'll need it later for your servers.)
In the general settings, leave everything as it is, except the "Traffic encryption merge key (password): " text field. Enter your desired password in the text field.
(NOTE: Don't forget the password, you'll need it later for your servers.)
If you click the Client Layout tab, it will just bring you to the theme options of the program, so you can just experiment with it by yourself, and set it up according to your taste.
Next, open up the No-IP DUC you downloaded earlier. Login with your credentials, and then select the DNS you created. Once that's done, you can proceed.
Next, open up the No-IP DUC you downloaded earlier. Login with your credentials, and then select the DNS you created. Once that's done, you can proceed.
That's pretty much it. The following procedures are just optional because the RAT will still work without it, but I recommend you to do it to avoid having problems.
Next, go to the Manage Users Group tab, and just uncheck the "Active users list groups", then close the window.
Next, go to the Manage Local DB. You should see no logs there, and then click the "Reset database" a few times, and "Refresh Data". Don't worry if nothing comes up, we're just clearing the database of your RAT.
After all of that, give yourself a nod of satisfaction for you just configured your RAT Client. The next part will be port forwarding, which is considered the most difficult part of the process if you don't know what you're doing.
Port Forwarding
Okay, if you have reached this part without troubles, then that's a good job.
Let's move on.
I won't be showing you any pictures here, since router models/brands are different. All you need to do is read carefully.
In port forwarding DarkComet, there are two options:
- Manual Port Forwarding
- Automatic Port Forwarding using UPnP
Let's move on.
I won't be showing you any pictures here, since router models/brands are different. All you need to do is read carefully.
In port forwarding DarkComet, there are two options:
- Manual Port Forwarding
- Automatic Port Forwarding using UPnP
Automatic Port Forwarding using UPnP
Now, DarkComet has a special feature when it comes to port forwarding. It can automatically forward your ports just by listening to it, and it uses the UPnP (Universal Plug 'n Play) feature of routers. So, for hassle-free port forwarding, we will try this method first.
Go to the Sockets/Net section of DarkComet RAT.
You will see two portions of the window there, the upper part and and the lower part. The upper part is where you'll listen to your ports. Right click there, and choose "Add port to Listen". A little window should appear with 1604 as default port number. You will also the UPnP option checked at the bottom. Now, a rule in port forwarding, you must use a high numbered port such as 1604, so that you're sure that there would be no conflicts with regards to services that are using the port. Just enter your desired port, or you can immediately listen to port 1604.
(NOTE: In port forwarding, you must always turn off all firewalls, including your OS firewall, your AV firewall, your software firewall if there are any, and your router firewall. If you're still concerned about your security, do RATting in a VM.)
After that, go to here:http://canyouseeme.org/, and type in the port you are listening to. Then click "Check". The page will load, and after that scroll down a bit, and if you see something like "Success! I can see your service at (IP Address) on (port number). Your ISP is not blocking your port", than only means you're good to go. If there's an error, refer to the F.A.Q. below the tutorial.
Manual Port Forwarding
If you can't port forward using UPnP for some reasons, mainly if your router doesn't support UPnP, then you'll have to manually forward your ports.
To do this, you will need to login to your router's page/panel. If you don't know how to do that, you must first know what's your Default Gateway. If you still don't know that, open CMD (Command Prompt), then type in "ipconfig", without the quotations. Find the Default Gateway there, and it should be 192.168.1.1 by default, but others are similar.
To do this, you will need to login to your router's page/panel. If you don't know how to do that, you must first know what's your Default Gateway. If you still don't know that, open CMD (Command Prompt), then type in "ipconfig", without the quotations. Find the Default Gateway there, and it should be 192.168.1.1 by default, but others are similar.
After finding the default gateway, type it in your browser, and you'll land on your router's login page. You will need to login for you to make changes. If you don't know the username and password of your router, try to look for the default here:http://www.routerpasswords.com/.
Just look for the model of your router, and you'll find it.
After logging in to your router's panel, you might want to check if your router supports UPnP or if it is enabled, so you can try to automatically forward your ports. If it's not there, look for this terms:
- Port Forwarding
- Port Mapping
- Port Triggering
- Applications and Games
Under those tabs, you can find the options of manual port forwarding there. Now, this will be the part where routers would get similar.
Once there, you must forward a port. There should be a starting port, and an ending port, and you should put the same port on both options. Also, there will be a drop down box there which will let you choose if you want the protocol to be TCP/UDP or both, choose both. Then, a text field for your IP address should be there, so you must enter your IP address. If you don't know your IP address, refer to the ipconfig you just did earlier. After all of that, you should apply and save changes.
Port forwarding is almost complete, except you need to test if it's forwarded properly. This is where the common mistake happens. In canyouseeme.org, you can get a success IF AND ONLY IF you are currently listening to the port you forwarded. So, open DarkComet, listen to the port, then check it via canyouseeme.org, and if it says success, then you're good. If not, refer to the F.A.Q. below.
Now, we're ready to build your server.
Building Your Server
Once you're done with port forwarding and setting up your client, you may now proceed to build your server. The server is the file/application that you'll send/spread to get victims.
To build your server, first open DarkComet, then click the main menu button (For DarkComet v5.0, it's the orange drop down button at the upper left part of DarkComet. If you're using DarkComet v4.2 and lower, click "Create New Server"). After that, select Server Module, and something like this would appear.
To build your server, first open DarkComet, then click the main menu button (For DarkComet v5.0, it's the orange drop down button at the upper left part of DarkComet. If you're using DarkComet v4.2 and lower, click "Create New Server"). After that, select Server Module, and something like this would appear.
Just follow the settings in the picture.
Click the Generate button several times to create the mutex.
Also, you can change the Server ID to whatever you want, it will just identify the server.
Click the Generate button several times to create the mutex.
Also, you can change the Server ID to whatever you want, it will just identify the server.
Let's go to the Network Settings tab:
Again, just follow the settings in the picture, and we're almost finished.
Now, double check each of the following tab:
- In Module Startup, it should be unchecked. (For crypting purposes, unless crypter settings requires it)
- In Install Message, it can be checked if you like.
- In Module Shield, all of them can be checked if you like, but I don't recommend them, especially if you're going to crypt it.
- In Keylogger tab, Active offline keylogger should be checked by default. If it isn't, check it.
- In Host File, it should be blank.
- In Choose Icon, you can choose any icon you like, but of course, you can do this later.
- In Add Plug-ins, it should be blank.
- In File Binder, you can bind files with your server if you like. Binding is the process of combining a file with your server, so that if the victim opens your file, the fake file would open, and make it less suspicious.
Now in the last tab, which is the Build Module, make sure in Compress Executable, make sure Disabled is checked. After that, you can check the Save profile settings at the bottom for future reference, then you can click the Build Server button. After click, a window would appear, and you'll have to choose where you want to save your server, and what name would you give it.
If you've made it this far, I want to congratulate you because everything is ready, you only have to test the server if it's working.
If you've made it this far, I want to congratulate you because everything is ready, you only have to test the server if it's working.
Testing The Server
There are two ways to test if your server is working.
First, you can test it on yourself. Just execute your server by double clicking it (I recommend you to use Sandboxie for testing servers). Then, if you can see something similar to this:
First, you can test it on yourself. Just execute your server by double clicking it (I recommend you to use Sandboxie for testing servers). Then, if you can see something similar to this:
Then, you know it's working, congratulations!
Second, you can test it by asking for test installs in Hackforums.
If no connections has been made, terminate your server in the processes using Task Manager, or just terminate it if you ran it using Sandboxie. After that, proceed to my F.A.Q below for answers on what could be the problem.
F.A.Q
Now, setting up a RAT is a bit hard, especially if you're a beginner, so here are some frequently asked questions, most often, problems, that you'll encounter on the process of setting up your RAT.
1. The No-IP Updater built in DarkComet is giving me errors. What should I do?
A: UPDATE: The No-IP updater might not work anymore (ever since DC fell), so just use the No-IP DUC which could be downloaded from the No-IP site.
1. The No-IP Updater built in DarkComet is giving me errors. What should I do?
A: UPDATE: The No-IP updater might not work anymore (ever since DC fell), so just use the No-IP DUC which could be downloaded from the No-IP site.
2. I checked my ports via canyouseeme.org, and it give me an error. What should I do?
A: There are several things you should remember when you're forwarding your ports. First, you should turn off all firewall (router, OS, and software firewalls are included), because it blocks your ports. In Windows 7, for example, the OS has 3 separate firewalls, so all of them must be off. Also, several AVs have built-in firewalls and network protections like Norton, so you must disable them. Some routers have firewalls which can't be disabled, but for sure, there is an exception list, so you just add your port in it's exception list if it can't be disabled. Another thing is that you should be listening to the port before you check it via canyouseeme.org, because it would just give you a "Connection refused" error if you're not listening to that port.
3. I tested my server, but it doesn't show connections. What should I do?
A: Usually, the problem is with the connection. Either your port isn't forwarded properly, or you're not listening to the port. There are also times that canyouseeme.org sees your service and says it's a success, but you can't get connections if you test it to yourself. The quickest way to know if it's working is by test installs from others.
That's all for now. I know it's long, but I'm pretty sure that after you followed everything here, your RAT would be working perfectly.


Comments
Post a Comment